

When we speak with our clients about Workflow in FilePro, we are normally referring to automating a pre-determined set of tasks that need to be completed for a specific area of law.
Previously, we highlighted FilePro’s Workflow feature to build your own process and precedents into FilePro – allowing individuality whilst building your IP and a strong firm culture. The benefits are wide ranging: whether for succession planning, best practice and improved productivity, allocation of duties with staff turnover/leave or to increase the value of your practice.
So which are the common areas where we are seeing workflows being used and what are the dos and don’ts when considering using our workflow feature?
Is it for everyone?
Automated Workflow naturally suits some disciplines more than others. Generally, areas of law where the work is repetitive and not prone to variation are better suited. Conveyancing, Personal Injury, Debt Recovery, simple Wills, EPAs etc. are all great examples.
Sometimes litigious matters that are more unpredictable are not as suited to a workflow model. However you might still design a flow of tasks for the high-level or baseline work, and then you can still add random tasks or sections of workflow ‘on-the-fly’.
You might also choose to have multiple Workflow ‘threads’ running concurrently, i.e. one for the legal work, and one for your CRM-type activities, such as introducing clients to the firm, keeping in touch, providing updated cost estimates on a regular basis, noting how they like their coffee etc.
What is the process for designing a Workflow?
Step 1 – Get buy-in
Speak with teams within your firm. Decide which teams will get value from Workflows and make sure that all members within these teams are on-board.
If there are one or two people in the team who are not interested and will not be ‘ticking off’ their tasks, then the project may not bring value.
These types of projects only tend to work if you have one or two champions to maintain momentum. Find these key people and allow them to allocate the required time if possible.
Step 2 – Spit-ball the idea
Have each team sit through a white-boarding session. Make sure everyone can agree on what the fundamental tasks are within a workflow, the order etc. and draw up some draft schematics.
Step 3 – What data is required?
It’s important to make sure that you are capturing all of the data that will trigger your tasks, influence the behaviour of your tasks and also populate information within documents linked to your tasks.
This might include updating your file opening procedure, making sure that relevant contacts are added and linked to your matters, plus inserting ‘custom fields’ for things like critical dates.
It is possible to have a task in your workflow insist that certain fields are filled in before you can move on. It is also possible for a task to only be required if a certain box is checked, a dollar value meets certain criteria, or dates are in a particular order etc.
For example, with conveyancing matters, task one is to generate your initial letter to the client. If you have allocated a field indicating that finance needs approval by a certain date, a paragraph in the letter automatically appears explaining this when the task is performed.
Step 4 – Documents required
Many tasks within your workflow will involve preparing a particular document. It’s in your best interest to have all of these documents set up as templates, so that you can link them to your tasks and have them automatically generate upon completing the task.
You might also take this opportunity, after having reviewed your data capture in step 3, to automate sections of the templates. This could be simply inserting pieces of information from the matter, attached parties, custom fields etc. Or it could be more complex as suggested above, e.g. a section only appears in a letter if a box is checked or something is greater than something else etc.
Step 5 – Designing the final flow-chart
Adding the actual workflows into FilePro will be exponentially easier if you have designed them properly beforehand.
Once again, break out that whiteboard, throw down the A2 drawing pad, or whatever it takes to finalise the flow-charts, which tasks lead into or influence others, which ones require documents to be generated, which ones need an automatic timesheet entered or clock started etc.
How do you insert it into FilePro?
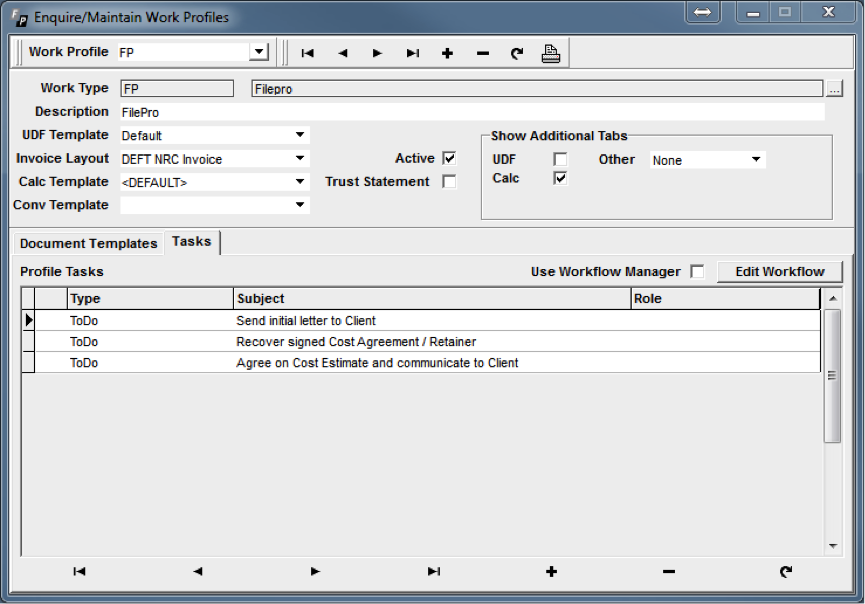
Once you have completed all of the steps above and have a design drawn up, you can then introduce them into the various Work Profiles in FilePro. This is all maintained under E/M Profiles in the Workflow menu and you have two main options:
Linear
You can simply add a set of tasks into the ‘Tasks’ tab as per the image below. When you open a File with this particular Profile code, all of the tasks will be added and can then be ‘ticked off’.
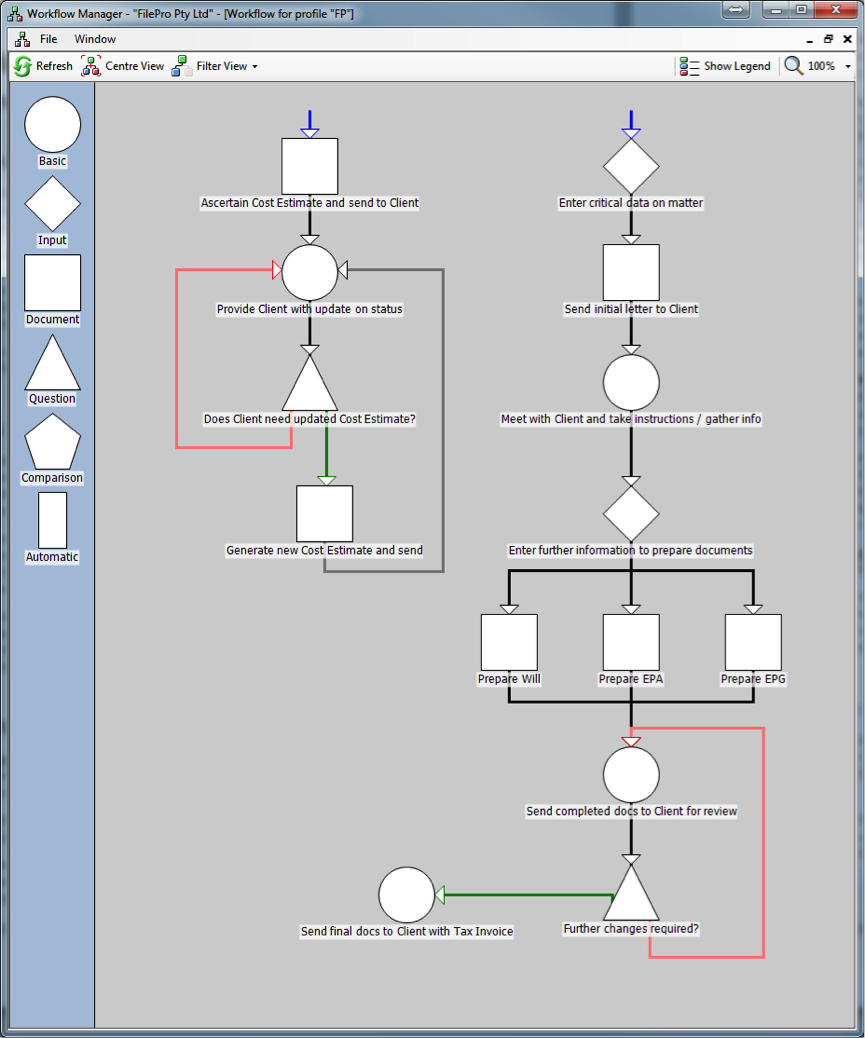
Graphical
If you really want to take advantage of FilePro’s workflow capabilities, you can utilise the graphical design panel, by clicking on the ‘Edit Workflow’ button. You will be taken to a Workflow Manager screen where you can drag & drop tasks from the left hand side, into the large grey area and construct your flow chart/s.
Reminders to complete your tasks
There are multiple ways to be notified that your tasks are due.
In the File
You can see a list of tasks in the Workflow tab of the File. There are some filters you can apply here to view certain tasks, and you can also access the graphical view, which provides further filtering options.
You can also add appointments in this tab, or place them in your Outlook Calendar and link them back to the File.
Task Manager
This screen can be used to view tasks based on various criteria, i.e. for particular team members, within a date range, by Work Profile, items that are incomplete or overdue etc.
Dashboard
Your tasks can be listed within a Dashboard Tile, which makes due dates very hard to miss.
Task Notifications
It is possible to deliver notifications to various team members based on the priority of your tasks. i.e. for low priority items the person completing the task can be notified on the due date; for high priority you might notify that person a week in advance, and then the File Manager on the due date.
FilePro will show a ‘pop up’ icon at the bottom right corner when notifications are active.
This feature is great to help with staff leave and turnover – you can delegate one staff member’s notifications to another person temporarily or permanently.
Outlook
Tasks can automatically be copied to the Outlook task list, which means you will get the standard Outlook notifications when items are due.
Getting value from your Workflows
Like any software tool, it is important that you maintain your workflows and keep them current. The champion/s you have designated to this role should try to regularly communicate with the teams within your firm to make sure that workflows are continuing to provide value.
Training, training, training! To maximise the value your teams receive from automated workflows, it is important to make sure new team members are introduced to the tools, processes and value that is provided to the firm by using workflows.
As you may have gathered from this article, adopting workflow in your office is not as simple as plugging in the tasks and away you go. Much of the hard work comes from leaning on your staff and agreeing on how work should be completed.
These agreed processes vary significantly from firm to firm, which is why software vendors do not tend to provide workflows ‘out of the box’.
However, if you would like further guidance on introducing workflow to your firm or more detail on the tools & process, please contact your FilePro helpdesk.